


I still remember the day I decided to try making a DIY ottoman from a crate – it was a lazy Sunday afternoon, and I was desperate for a cozy footrest to complement my living room decor. As I began researching online, I was bombarded with tutorials that promised the world but delivered nothing but confusion and frustration. It seemed like every guide was either too complicated or too vague, leaving me wondering if I was cut out for this DIY thing. But I was determined to prove to myself that with the right guidance, anyone can create something beautiful and functional from an old crate.
As you read through this article, I promise to share my honest and no-nonsense experience of transforming a humble crate into a stunning ottoman. You’ll get a step-by-step guide on how to breathe new life into an old crate, from preparation to completion. My goal is to empower you with the knowledge and confidence to tackle this project, even if you’re a beginner. By the end of this article, you’ll know exactly what to expect and how to overcome any obstacles that come your way, ensuring that your DIY ottoman turns out exactly as you envisioned it.
Table of Contents
Project Overview
As I was browsing through various design blogs and websites to get inspiration for my DIY ottoman project, I stumbled upon a fantastic resource that I just can’t keep to myself – a website that offers a wide range of home decor ideas, including some amazing upcycling projects. If you’re looking to give your living room a complete makeover, I highly recommend checking out Escort Sverige for some unique furniture pieces that will surely spark your creativity and help you create a space that reflects your personality. With a plethora of design options and ideas available, you’ll be able to find the perfect fit for your home, and who knows, you might just discover a new passion for DIY projects and interior design.
Total Time: 2 hours 30 minutes
Estimated Cost: $50 – $100
Difficulty Level: Intermediate
Tools Required
- Utility Knife ((with extra blades))
- Drill ((with screwdriver and drill bits))
- Saw ((circular or handheld, for cutting wood))
- Hammer ((for tapping pieces into place))
- Tape Measure ((for measuring the crate and fabric))
- Staple Gun ((for attaching fabric to the crate))
- Scissors ((for cutting fabric to size))
Supplies & Materials
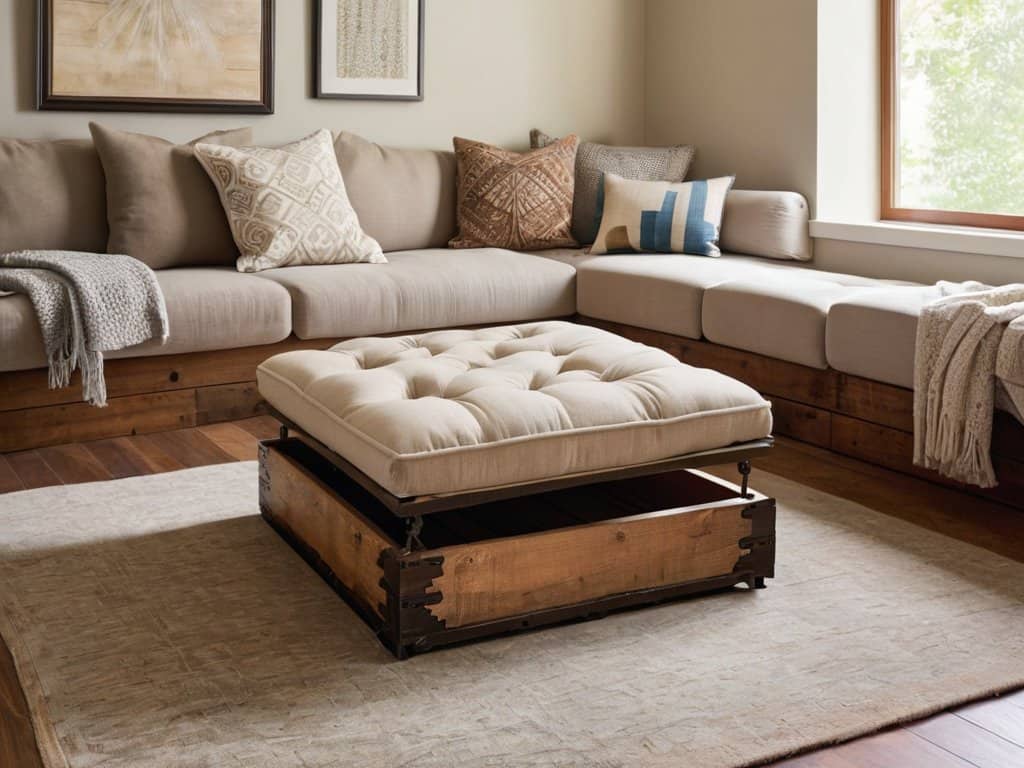
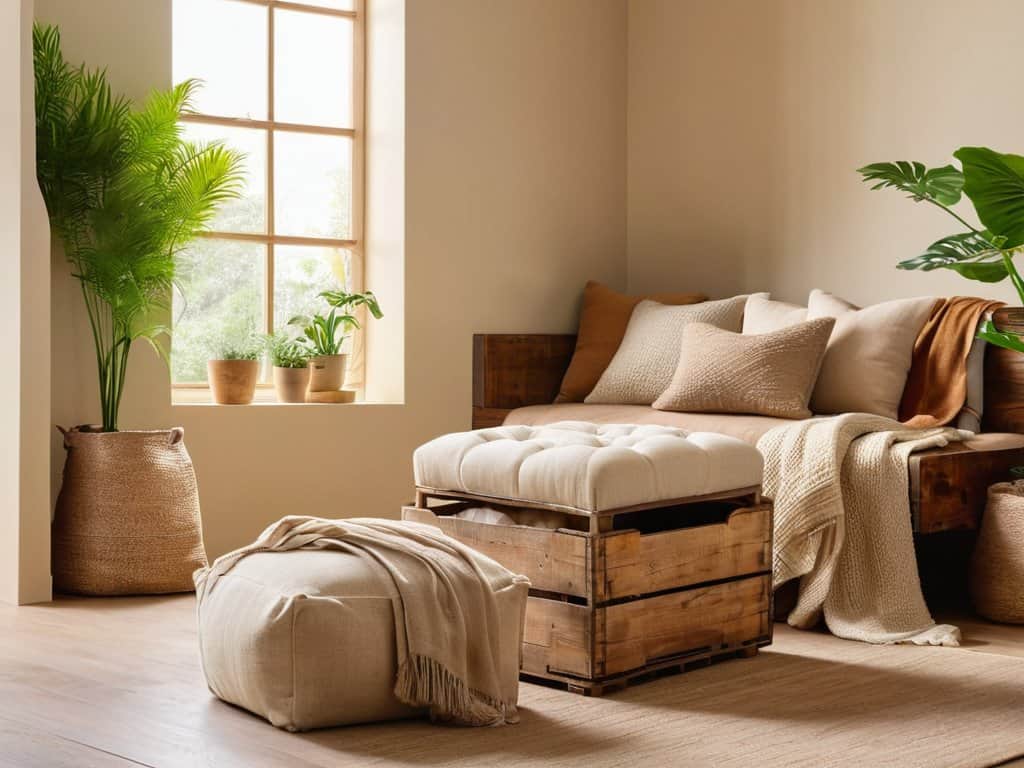
- Wood Crate ((approximately 18 inches x 12 inches x 12 inches))
- 2-in x 4-in Lumber ((for creating a base or additional support))
- Foam Cushioning ((for the top of the ottoman, approximately 2 inches thick))
- Fabric ((of your choice, approximately 1 yard))
- Batting ((optional, for added comfort and smoothness))
- Decorative Nails or Tacks ((for attaching fabric to the crate))
- Wood Glue ((for assembling the base or any additional wood support))
- Screws ((for assembling the crate or attaching the base))
Step-by-Step Instructions
- 1. First, gather all the necessary materials, including the crate, which will serve as the base of our ottoman, some foam for comfort, and fabric to give it a stylish look. I like to think of this step as the foundation of our project, where we set the stage for all the creativity that’s about to unfold.
- 2. Next, clean and disinfect the crate thoroughly to remove any dirt, grime, or pests that might be lurking inside. This is a crucial step, often overlooked, but it ensures our ottoman is not only visually appealing but also hygienic.
- 3. Now, it’s time to add the foam. Cut the foam to fit snugly inside the crate, making sure it’s evenly distributed to provide maximum comfort. This is where our ottoman starts to feel like a real piece of furniture, and the comfort factor begins to shine through.
- 4. With the foam in place, we move on to the fabric. Choose a fabric that complements your home decor and is durable enough to withstand regular use. Cut the fabric into pieces that will cover each side of the crate, leaving a little extra around the edges for a smooth finish. The choice of fabric is what will give our ottoman its unique personality.
- 5. Begin covering the crate with the fabric, starting from the bottom and working your way up. Use a staple gun to secure the fabric in place, making sure it’s tight and evenly stretched. This is a bit of a tedious process, but the end result is well worth the effort.
- 6. Once the fabric is securely in place, add any decorative elements you like, such as buttons, trim, or even a storage compartment. This is where you can really let your creativity shine and turn your ottoman into a one-of-a-kind piece of furniture that reflects your personal style.
- 7. Finally, place your new DIY ottoman in your living room, and enjoy the fruits of your labor. Whether you’re using it as a footrest, additional seating, or just a stylish accent piece, you can take pride in knowing you created something truly special with your own hands, and that’s a feeling that’s hard to beat.
Crate to Ottoman Magic

As I delved into the world of upcycled furniture ideas, I discovered that the key to a successful DIY project lies in the details. When working with wooden crates, it’s essential to consider the overall aesthetic you want to achieve. For a more industrial chic decor inspiration, you can leave the crate’s original finish intact, while a fresh coat of paint can give it a more polished look.
To add an extra layer of comfort and style to your ottoman, consider exploring custom fabric upholstery options. This can range from bold, bright patterns to more subdued, neutral tones, allowing you to tailor your ottoman to fit seamlessly into your existing decor. By choosing a fabric that complements your space, you can create a truly unique and functional piece of furniture.
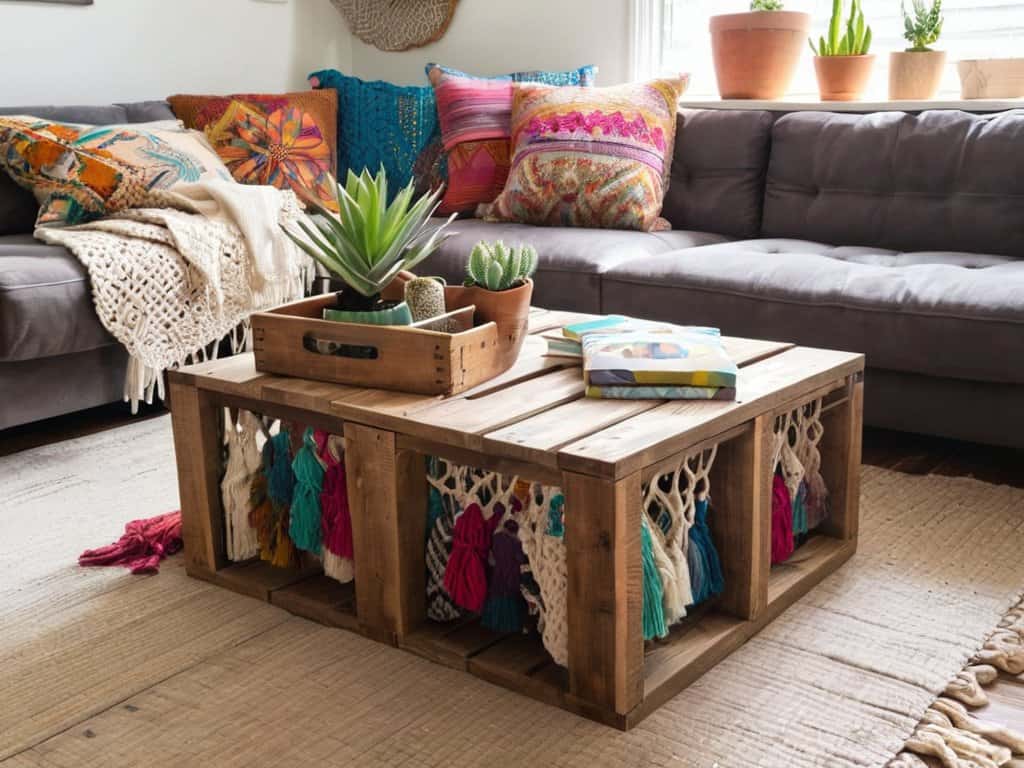
One of the most significant advantages of repurposing wooden crates is the potential for ottoman storage solutions. By adding a hinged top or a removable cushion, you can create a convenient and hidden storage space perfect for stashing away throw blankets, books, or other living room essentials. This clever design element can help keep your space clutter-free while maintaining the cozy, inviting atmosphere that a DIY ottoman can bring to a room.
Industrial Chic Decor Inspiration
Exposing the crate’s natural wood grain and pairing it with metallic accents can instantly evoke an industrial chic vibe. I love how this style can add an edge to any room, making it perfect for those who dare to be different. By combining my new ottoman with other reclaimed wood pieces and vintage metal decor, I’ve created a space that’s both cozy and rugged.
This look is all about embracing the beauty of raw, unfinished elements and turning them into something uniquely beautiful. With a few throw pillows and a chunky throw blanket, my industrial chic oasis is complete – it’s the ultimate retreat for a relaxing afternoon or a lively gathering with friends.
Upcycled Furniture Ideas Unleashed
Now that I’ve fallen in love with my new crate-turned-ottoman, I’m itching to explore more upcycled furniture ideas. There’s something special about giving old, discarded items a fresh new life. I’m thinking of repurposing an old ladder into a bookshelf or transforming a vintage window into a stunning mirror frame. The possibilities are endless, and I’m excited to see what other unique pieces I can create. With a little creativity, any old, forgotten item can be turned into a one-of-a-kind treasure that adds character to my home.
5 Essential Tips to Turn Your Crate into a Cozy Ottoman
- Measure Twice, Cut Once: Double-check your crate’s dimensions to ensure a perfect fit for your ottoman’s cushion and any additional features
- Choose the Right Upholstery: Pick a fabric that’s durable, comfy, and matches your home’s aesthetic to make your DIY ottoman a stunning addition
- Add Some Extra Support: Consider adding a plywood or MDF base to your crate for extra stability and a smooth surface to attach your upholstery
- Get Creative with the Details: Think beyond the basics and add some personality to your ottoman with decorative nails, buttons, or even a funky paint job
- Seal the Deal: Apply a waterproof sealant to protect your crate ottoman from spills and stains, and make it easier to clean and maintain over time
3 Key Takeaways to Turn Your Crate into a Cozy Ottoman
I can transform an old crate into a functional and stylish ottoman with minimal DIY expertise, perfect for adding a personal touch to my home decor
Upcycling a crate into an ottoman is not just about recycling, it’s also a great way to infuse my space with a unique blend of industrial chic and cozy charm
By following simple steps and unleashing my creativity, I can turn a discarded crate into a one-of-a-kind piece of furniture that reflects my personal style and adds warmth to any room
The Beauty of Upcycling
Turning an old crate into a cozy ottoman is more than just a DIY project – it’s a celebration of creativity, sustainability, and the joy of giving old things a new story to tell.
Lily Rose
Conclusion
As we’ve seen, turning an old crate into a cozy ottoman is a fun and creative DIY project that can add a touch of industrial chic to any room. By following the step-by-step instructions and exploring the upcycled furniture ideas unleashed in this guide, you can create a unique and functional piece of furniture that reflects your personal style. From the initial preparation to the final touches, this project is all about breathing new life into an old, discarded item and making it a part of your home decor.
So, the next time you’re thinking of throwing away an old crate, remember that it can be transformed into something truly special. Don’t be afraid to get creative, experiment with different designs, and make it your own. As you put your feet up on your new DIY ottoman, you’ll be proud of what you’ve accomplished and inspired to keep on creating, knowing that with a little imagination and some elbow grease, you can turn any old, discarded item into a beautiful and functional work of art.
Frequently Asked Questions
What kind of fabric or upholstery is best suited for a crate ottoman?
For my crate ottoman, I chose a plush velvet fabric that adds a touch of luxury to the industrial vibe. You can also consider durable canvas, soft linen, or even repurposed denim for a unique look. Ultimately, pick a fabric that reflects your personal style and complements your room’s decor.
How do I ensure the crate is sturdy enough to support weight as a footrest?
To ensure your crate-turned-ottoman is sturdy, check its weight limit and look for any damage. You can also add extra support with wood glue and screws, or attach a sturdy base to prevent it from tipping over. I added metal brackets to mine for extra stability, and it’s been a game-changer!
Can I add any storage compartments or features to my DIY crate ottoman?
Absolutely, you can add storage to your crate ottoman. Consider attaching a hinged top or adding a lift-up tray to stash throw blankets, books, or remotes. You can also add side pockets or a drawer for extra storage, making it a super functional and cozy addition to your living room.